Let's build a volcano!
This is a very messy project—especially at the end when the volcano erupts. Wear old clothes and work on a pile of newspapers (or even better, outdoors). (parental supervision is advised)
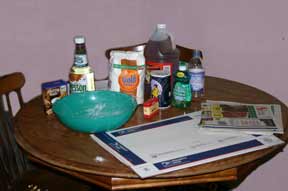
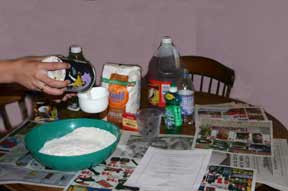
Begin by gathering all your ingredients; you should have everything you need around the house.
What you'll need:
- Aluminum cookie sheet
- Cardboard box
- Lots of old newspaper
- Measuring spoon and measuring cup
- Modeling clay (flour, salt, water)
- Funnel
- Small plastic bottle (like a small pop bottle)
- Baking soda (about 3-4 tablespoons)
- Vinegar (about 1/2 cup)
- A few drops of liquid dishwashing detergent
- Red food coloring
- Glitter (optional)
Modeling Clay and Eruption Recipes
 Choose a spot to
build your volcano that is okay to occupy
for a couple of days because the volcano will need time to dry. You
should also choose a spot that is easy to clean up—this project
is messy! Your backyard would be an ideal location, if the weather is
good.
Choose a spot to
build your volcano that is okay to occupy
for a couple of days because the volcano will need time to dry. You
should also choose a spot that is easy to clean up—this project
is messy! Your backyard would be an ideal location, if the weather is
good.
Spread newspapers over your work area.
Use a large piece of cardboard as a platform for your volcano. A large tray or cookie sheet with sides all the way around will help contain your volcanic eruption. Cut the cardboard to fit inside the tray.
 Try
to find a small beverage bottle, so that you can use less clay to model
your volcano. A 16-oz soda bottle will require about three batches of
clay. This can get quite heavy if you want to move the volcano. Some
people use papier mache' for part of the volcano to make it lighter.
However, if you want to keep the volcano and use it again, modeling
clay is best.
Try
to find a small beverage bottle, so that you can use less clay to model
your volcano. A 16-oz soda bottle will require about three batches of
clay. This can get quite heavy if you want to move the volcano. Some
people use papier mache' for part of the volcano to make it lighter.
However, if you want to keep the volcano and use it again, modeling
clay is best.
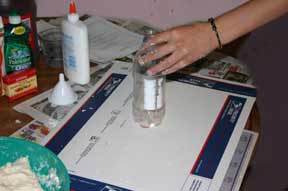
Cut
the neck off the bottle at a slight angle. This creates a wider opening
for the lava flow, and the angle makes the volcano opening look more
realistic. 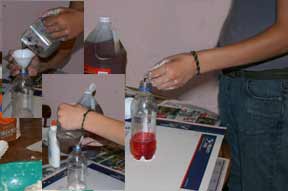 Glue the bottle to the center of the cardboard base. Let
it dry for about an hour.
Glue the bottle to the center of the cardboard base. Let
it dry for about an hour.
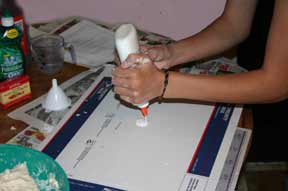
You may then add all of the ingredients for the first eruption except the baking soda to the bottle (vinegar, dish soap, and red dye).
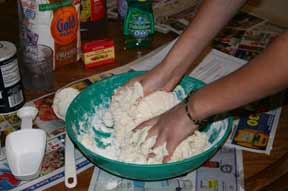
 While
you wait, mix your clay. Begin by mixing the flour and salt. Then add
the water and mix with your hands until you have a clay-like consistency.
It must be moist enough to hold together, but as dry as possible, so
it doesn’t take too long to cure.
While
you wait, mix your clay. Begin by mixing the flour and salt. Then add
the water and mix with your hands until you have a clay-like consistency.
It must be moist enough to hold together, but as dry as possible, so
it doesn’t take too long to cure.
 Start
building your volcano from the bottom, molding
the clay around the base and working toward the top. Remember, you need a wide bottom and a narrow top. When you run out of clay, let the volcano
dry for awhile before mixing another batch. Sometimes if the
Start
building your volcano from the bottom, molding
the clay around the base and working toward the top. Remember, you need a wide bottom and a narrow top. When you run out of clay, let the volcano
dry for awhile before mixing another batch. Sometimes if the 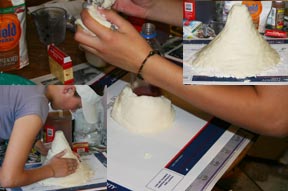 volcano
dries on the outside and the inside is still moist, the inside will
expand, creating surface cracks and fissures. This is okay because that
is what happens in real volcanoes. But if the interior is too moist,
the weight will cause the whole thing to break away from the bottle.
Volcanoes look like mountains, so lumps and bumps are good. You can
also sculpt erosion gullies and lava channels after the volcano has
dried for awhile.
volcano
dries on the outside and the inside is still moist, the inside will
expand, creating surface cracks and fissures. This is okay because that
is what happens in real volcanoes. But if the interior is too moist,
the weight will cause the whole thing to break away from the bottle.
Volcanoes look like mountains, so lumps and bumps are good. You can
also sculpt erosion gullies and lava channels after the volcano has
dried for awhile.
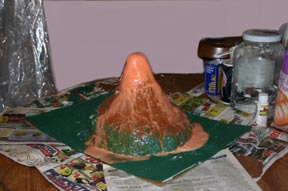
Let the volcano completely dry before you paint it. Use a base color like brown to paint the entire volcano and the base. Then paint green for trees, white for snow at the top, etc. Or you can use entirely different colors–whatever your imagination dictates. If you want texture, you can sprinkle fine sand on the wet paint. You can use small twigs and grass for trees, but remember, you are building a mountain, so individual trees would be difficult to see from your perspective.
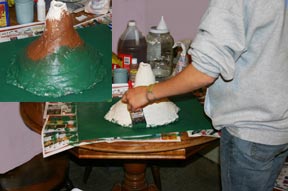 When
the paint dries, you will be ready for the eruption. Place your baking
soda in a small square of tissue. Gather the edges and twist them together.
Drop the baking soda into the volcano, wait several seconds, and you
will begin to see your eruption.
When
the paint dries, you will be ready for the eruption. Place your baking
soda in a small square of tissue. Gather the edges and twist them together.
Drop the baking soda into the volcano, wait several seconds, and you
will begin to see your eruption. 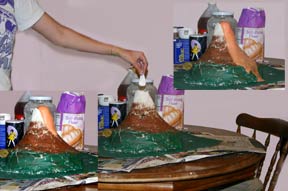
Your volcano should be very durable, so you can keep it and erupt it many times if you like!
Just remember that the eruption is messy and plan accordingly.
Model Volcano
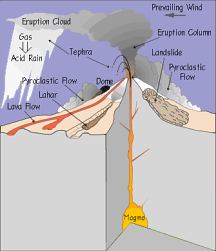 In a
real volcano, molten rock from deep within the Earth erupts through
a volcano (the molten rock is called magma when it is within the Earth
and is called lava when it comes out
of a volcano). In this project, a mock volcano will erupt with a bubbly,
fizzy liquid that is created by a simple chemical reaction.
In a
real volcano, molten rock from deep within the Earth erupts through
a volcano (the molten rock is called magma when it is within the Earth
and is called lava when it comes out
of a volcano). In this project, a mock volcano will erupt with a bubbly,
fizzy liquid that is created by a simple chemical reaction.
This project shows what happens when an acid (vinegar) and a base (baking soda) interact. Chemically, the acid and base neutralize each other, producing carbon dioxide gas as a byproduct. The exact reaction is:
HC2H3O2 (vinegar = acetic acid) + NaHCO3 (baking soda = sodium bicarbonate) = CO2 (carbon dioxide gas) + NaC2H3O2(sodium acetate) + H2O (water)
Volcanoes are commonly divided into three basic types, although not all fit neatly into one of these categories. These are shield volcanoes, composite cones, and calderas.
 Shield volcanoes are low and rounded, shaped like a warrior’s shield. They get this shape because the lavas that form them are relatively hot and fluid compared to other lavas. Because the lavas flow easily, they do not pile up to form steep-sided cones, but instead may flow for miles or tens of miles before they cool. Although these volcanoes produce some ash and coarser materials, lavas usually dominate. Any volcano is dangerous, but shield volcanoes are generally the least dangerous.
 Composite
cones are some of the most spectacular and famous volcanoes, for example Mt. Vesuvius web cam link, Mt. Rainier,
or Mt. St. Helens web cam link (which was our last big eruption in the United States). The lavas that
form composite cones are not as hot or as fluid as the
Composite
cones are some of the most spectacular and famous volcanoes, for example Mt. Vesuvius web cam link, Mt. Rainier,
or Mt. St. Helens web cam link (which was our last big eruption in the United States). The lavas that
form composite cones are not as hot or as fluid as the 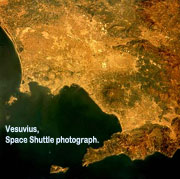 lavas
that form shield volcanoes. Therefore, they tend to pile up and make
the classic, and beautiful, volcanic cone with steep sides rather than
spread out for many miles.
lavas
that form shield volcanoes. Therefore, they tend to pile up and make
the classic, and beautiful, volcanic cone with steep sides rather than
spread out for many miles.
These volcanoes can be very explosive, and therefore dangerous. They are much less predictable than shield volcanoes. Even though Mt. St. Helens was being monitored very carefully prior to its eruption in 1980, the way it erupted was a surprise, and dozens of people were killed. Another hazard associated with composite cones is landslides (most commonly mudflows). The steep sides of the volcanic cone combined with lots of fairly loose volcanic ash and debris created by explosive eruptions can create massive mudflows when saturated with water. These mudflows may travel down canyons at tens of miles per hour, overwhelming everything in their path. Large mudflows sometimes kill thousands of people where towns have been built in their path.
Calderas
are the champions of volcanoes, and are generally the least-recognized.
Yellowstone National Park owes its spectacular geysers, steaming fumaroles,
and hot springs to a caldera-forming  eruption that happened about 600,000 years ago. If you visit Yellowstone,
it does not look like a volcano. That’s because it is so big
(the caldera is about 25 miles by 45 miles across), and it did not
form a big volcanic cone like Mt. Rainier.
eruption that happened about 600,000 years ago. If you visit Yellowstone,
it does not look like a volcano. That’s because it is so big
(the caldera is about 25 miles by 45 miles across), and it did not
form a big volcanic cone like Mt. Rainier.
In these highly explosive volcanoes the magma has a high resistance to flow, and also contains a large amount of gases (mostly steam). As the magma nears the earth’s surface, the pressure from the overlying rocks is no longer sufficient to hold the gases inside the magma. As a result, the gases literally blow the magma apart, creating great volumes of volcanic ash and coarser debris. This material forms very hot, dense clouds that move along the earth’s surface at speeds that may exceed 100 miles per hour. It was a cloud of this type that did much of the damage when St. Helens erupted in 1980.
Imagine taking a bottle of soda pop and shaking it up as you hold your thumb over the top of the bottle. When you remove your thumb, the insides of the bottle comes foaming out, spurting into the air and flowing down the side of the bottle. This is similar to what happens in an explosive volcanic eruption. In fact, so much magma is blown out as ash that the overlying crust collapses, leaving a hole at the surface that may be over 10 miles across and a mile or more deep. This hole is the caldera. In large calderas this hole commonly fills with the volcanic ash being erupted.
Many calderas have formed in the geologic past, but we have never witnessed a large caldera-forming eruption since man first began writing down history. We probably don’t want to! The large eruptions would be capable of altering the earth’s climate for several years, and the ash erupted could destroy human habitation over an area that could easily cover several states.
Volcano Information Sites


![]()